No products in the cart.
Payment methods accepted
Unsure what Ethernet cable you need?
Look no further than our Ethernet Cable Finder. Answer a couple of questions and let trueBOT guide you to the perfect cable for any situation.
Still have questions? Check out our in-depth blogs, insightful white papers, and instructional videos on all things Ethernet cable and low voltage supplies.
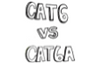
Read: The Difference Between Cat6 vs Cat6A Ethernet Cable

Understand: Selecting the Correct Outdoor Ethernet Cable
Time to find coaxial cable and connectors for your install? Well, you are in the right spot!Check out our in-depth blogs, white papers, and instructional videos about everything going on in the low voltage industry and one of the best sources for coaxial information.
Have questions? Our networking experts have the answers!Check out our Cable Academy. for more information.

Read: The Difference Between Dual Shield vs Quad Shield Coaxial Cable
Understand: How To: Universal RG6 Compression F Connector on Quad Shield Coaxial Cable
Fiber Optic expertise at your fingertips.
Looking to deepen your understanding of fiber optic technology? Look no further than trueCABLE's Cable Academy. Our extensive collection of blogs, masterfully crafted by industry experts, offers a wealth of invaluable insights into the world of fiber optic cabling.
Have questions? Our networking experts have the answers.Check out our Cable Academy. for more information.
Read: Fiber Optic Splicing: Examining the Factors that Affect Splice Performance
Understand: Using Fiber Optics to Extend Your Ethernet Network Beyond Copper's Limits
Effortless cable management. Learn how we do it.
Low-voltage tools and accessories should keep your networking installations clean and organized. trueCABLE has a variety of high quality cable management tools, accessories and informative blogs for all your installation needs.
Check out our Cable Academy today and expand your knowledge.
Read: Copper Fabric Strips for Bonding Shielded Ethernet Cable
Understand: When Aliens Attack! Avoiding Ethernet Alien Crosstalk

Written by Don Schultz, trueCABLE Senior Technical Advisor, Fluke Networks Copper/Fiber CCTT, BICSI INST1, INSTC, INSTF Certified
Coaxial cable has been around for some time. You may never have terminated it, but you almost have certainly handled it and perhaps not even known you did. If you have ever screwed a cable into the back of a TV, DVR, CATV box, cable modem, or satellite dish you definitely just worked with coax cable. The most common coaxial cable is RG-6/U these days. You see it referred to as RG6, RG-6, RG6/U, and more. These terms all mean the same thing. What can get even more confusing is the shielding and jacket types. There is dual shield, tri-shield, and quad shield. You often see the dual shield referred to as DS and the quad shield referred to as QS. If you would like to learn more about the differences between these two, please see The Difference Between Dual Shield vs Quad Shield Coaxial Cable.

This blog includes a video. I suggest you watch the short video and also read the blog. You can get close-up photos in a written blog!
trueCABLE has introduced both quad and dual shield RG6 coax cable, with solid bare copper conductors (referred to as BC or bare copper). There is another variety out there, called CCS or copper clad steel which is also acceptable for use per the TIA standard, but it’s applications are a bit more limited. See more about the differences between solid copper and copper clad steel in Copper Clad Steel (CCS) vs Solid Copper Coax.
This blog is all about working with RG6 dual shield coaxial solid copper cable, otherwise known as RG-6/U DS. We will talk about how the cable is constructed, how to prepare it for termination, and finally demonstrate a trueCABLE F-Connector pre-production sample sneak peek. Here we go!

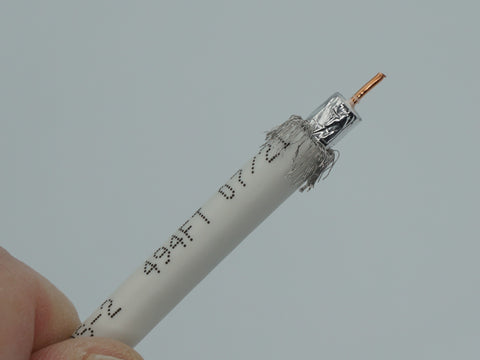
Coaxial cable, compared to twisted pair Ethernet cable, is actually quite simple. The solid copper center conductor acts as one half of the communications circuit, while the aluminum braid shield functions as the other half. The braid shield does double duty as an actual shield as well. The 18 AWG conductor is surrounded by a non-conductive dielectric hard foam. Over the dielectric is foil tape that provides 100% coverage.
Dual shield coaxial cable is very straightforward when preparing the cable for termination. This process consists of:
Stripping to 1/2”, with a 1/4” + 1/4” dual level strip involved
Combing back the braid shield away from the foil shield
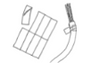
The tools required for the job are; one for cutting your cable to length and one for performing the correct strip. Fortunately, trueCABLE has been offering a handy tool for some time that does both of these functions and also has a braid comb on it, our Cable Cutting & Stripping Tool.

Here is the step by step preparation process, with pictures:

Put the cable end into the tool, cut-end even with the right side
Once the cable is properly inserted, turn the entire tool clockwise.
You will hear and feel a grinding noise. That is the first level strip blade cutting through the wire braid shield and down to the copper conductor.
After the grinding stops, continue turning three more times as this will now slice into the cable jacket for the second level strip...but be careful not to accidentally overstrip on this step, as you will remove more braid shield than you want to!
Take the cable out of the tool and pull off the two pieces as below

Proper 1/4” and 1/4” strip. You know you did well when pulling off the hollow jacket piece and little to no pieces of wire braid shield came off with it!

If you see a lot of little pieces of wire braid accidentally cut off during this step, start over. The wire braid shield must be largely intact for the cable to function properly.

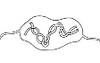
Braid shield comb in action!
Properly combed back wire braid shield

Properly seated F Connector, flush in this example
After the F-Connector is properly seated, you may compression crimp the connector onto the cable.

trueCABLE RG6 compression tool in action

Properly compressed RG6/U F Connector
After compression, it is recommended to firmly tug on the connector a couple of times to make certain it is firmly attached.
So, there you have it. This termination process is much simpler than with Ethernet cable, and is easy for the average Weekend Warrior or DIY’er to get the hang of. The F Connectors shown here are pre-production samples for your viewing pleasure!
HAPPY NETWORKING!
trueCABLE presents the information on our website, including the “Cable Academy” blog and live chat support, as a service to our customers and other visitors to our website subject to our website terms and conditions. While the information on this website is about data networking and electrical issues, it is not professional advice and any reliance on such material is at your own risk.