No products in the cart.
Payment methods accepted
Unsure what Ethernet cable you need?
Look no further than our Ethernet Cable Finder. Answer a couple of questions and let trueBOT guide you to the perfect cable for any situation.
Still have questions? Check out our in-depth blogs, insightful white papers, and instructional videos on all things Ethernet cable and low voltage supplies.
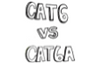
Read: The Difference Between Cat6 vs Cat6A Ethernet Cable

Understand: Selecting the Correct Outdoor Ethernet Cable
Time to find coaxial cable and connectors for your install? Well, you are in the right spot!Check out our in-depth blogs, white papers, and instructional videos about everything going on in the low voltage industry and one of the best sources for coaxial information.
Have questions? Our networking experts have the answers!Check out our Cable Academy. for more information.

Read: The Difference Between Dual Shield vs Quad Shield Coaxial Cable
Understand: How To: Universal RG6 Compression F Connector on Quad Shield Coaxial Cable
Fiber Optic expertise at your fingertips.
Looking to deepen your understanding of fiber optic technology? Look no further than trueCABLE's Cable Academy. Our extensive collection of blogs, masterfully crafted by industry experts, offers a wealth of invaluable insights into the world of fiber optic cabling.
Have questions? Our networking experts have the answers.Check out our Cable Academy. for more information.
Read: Fiber Optic Splicing: Examining the Factors that Affect Splice Performance

Understand: Using Fiber Optics to Extend Your Ethernet Network Beyond Copper's Limits
Effortless cable management. Learn how we do it.
Low-voltage tools and accessories should keep your networking installations clean and organized. trueCABLE has a variety of high quality cable management tools, accessories and informative blogs for all your installation needs.
Check out our Cable Academy today and expand your knowledge.
Read: Copper Fabric Strips for Bonding Shielded Ethernet Cable
Understand: When Aliens Attack! Avoiding Ethernet Alien Crosstalk

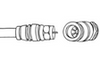
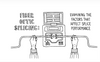
This combined video and written blog will show you how to put on one of the most easy to terminate standard load bar unshielded plugs. I do not make this statement lightly, as I find this plug a joy to work with, and the load bar is unique. This style of plug has a solid nose and a staggered green load bar for organizing the conductors prior to insertion into the plug housing. Think of the load bar as the third hand you always wanted, but could not afford to get grafted onto you. The conductors don’t pass-through the front prior to termination onto your cable with this kind of plug. But they do pass-through the load bar, providing the convenience of a pass-through plug but with reduced crosstalk due to minimal untwisting of the conductors. Since this plug minimizes the amount of crosstalk in the finished termination, it is the only modular crimp-on plug we recommend for trueCABLE brand unshielded Cat6A cable. Let’s get started!
Recommendation? I suggest you watch the video and read this blog as both bring their own level of detail to the table.
You may be asking yourself why you would want to use one of these load bar RJ45 plugs when you have access to the latest and greatest new fangled pass-through kind? Believe it or not, there are quite a few people who prefer them for the following reasons:
First, you should make certain that your cable will fit onto the RJ45 plug. The whole “category” thing is very misleading unless the cable and RJ45 plug are both made by the same manufacturer as is the case with trueCABLE. trueCABLE will stamp a Category on the bag because we go the extra step of confirming fitment and performance with our cable. If your Ethernet cable is of a different brand, you need to confirm fitment. A great resource is Selecting the Correct Connector.
For those who would like to understand more about RJ45 plugs and why there can be such a great deal of confusion surrounding them, please read What is an RJ45 Connector?
Enough of that! Let’s jump right into terminating the little beast, shall we?
We will demonstrate this termination with trueCABLE Cat6A Unshielded Riser Ethernet cable. This cable has been fitment and performance tested when using our Cat6-6A Standard unshielded plug. In fact, all of our Cat6 and Cat6A unshielded cable will fit this plug!
Tools you will absolutely need are:

Recommended tools to make your life a lot easier (and less painful):

You will definitely want to use these!

Strip off about 1.50” of cable jacket, carefully!
Now, pop the jacket open at the score and remove the jacket. Keep the jacket piece, it will be a free tool for at least five minutes. I promise.

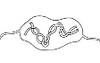
Properly scored jacket being “popped”

Look at the conductors at the cable jacket edge. Check for nicks (slices in the conductor insulation or even noticeable copper).

Flush cutting that ripcord right off. You don’t want it.
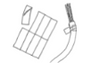
This internal spline skeleton is present on all trueCABLE Cat6 and Cat6A cables. The purpose of the spline is to minimize cross-talk (NEXT). Never cut the spline straight across. You want to snip each “wing” of the spline and then twist to remove. Cut at a slight downward angle. You want as much spline removed as possible.

Make four cuts. Snip each wing while resting the clippers on the end of the cable jacket and clipping downward at a slight angle. Be careful not to nick a conductor. Twist to remove
You get to use your free tool now! Check to be certain the conductors are untwisted as much as practical, but not more than necessary. In other words, right down to the cable jacket but no further.

Untwist time. You can toss your free tool when done.
Don’t have too much fun on this step.

Easy does it. Don’t overwork the conductors as you might thin out the copper.
Be warned that the spline will fight you every step of the way. When doing this, be sure you don’t excessively cross over the conductors at the jacket edge. Keep the cable jacket area “clean” and neat. Less neat = more difficulty putting on the load bar right. If you are using T568B like I do, the solid green wire will cross over, so that you will have to live with.

T568B sequence shown. I like to work from top down (if I can). White-orange at the top, and solid brown at the bottom.
Here is a handy reference for you. When looking at the conductor color sequence, be sure you understand the orientation of the plug itself! Yes, it is quite possible to get the sequence correct and put the load bar or plug on upside down. I have done it, so don’t be a Don.

For this part, you will need to grab a load bar. Ideally, you will have this close by and handy so you don’t have to take your fingers off the conductors. You know what happens if you do that.
The load bar is position sensitive (it only goes on one way), so be sure you have oriented the load bar properly in relation to your conductor sequence!

Flush cut straight across. Leave about 1” or so of conductor left. Notice how neat and organized the conductors are at the cable jacket edge? Yeah, you want it like that.

Take note! The conductors will only slide easily into the flared end of the load bar. Be sure the 45 degree angled load bar “ledge” is up (towards you) and the white-orange conductor is on “top”. The conductors will automatically stagger for you.

Confirm the color sequence is still correct. Slide the load bar down towards the jacket as far as it will reasonably go. About ¼” or less from the end of the cable jacket is what you want. The picture demonstrates a good position.

Precisely and completely flush cut the conductors at the front of the load bar.

The load bar staggers the conductors because they will not physically fit inside the plug in a normal “8 across” fashion. Conductor insulation thickness is the reason. The stagger design has the side benefit of reducing crosstalk at the connector and improving performance. This applies especially to Cat6A which is very sensitive.

With the RJ45 plug housing flat side up (bottom towards you), start pushing the load bar assembly into the plug.

The load bar fully seated at the plug nose. The load bar will put the conductors right under the golden contact pins for you, so once it stops you don’t need to push any further.

The plug will only go in one way. Use light pressure to insert and hold the cable. Do not force it. Cycle the handle fully down. Once you start to cycle the tool, you can remove your hand from holding the cable in place. The strain latch presser bar will come upwards and lock the plug into the tool until you raise the handle back up.

All done! So, there you have a Cat6-6A standard load bar RJ45 connector on your cable now. Go plug it in and HAPPY NETWORKING!
Wait!
Something not right? Your cable not performing your expectations? You could have a bad or poorly terminated RJ45 plug. Better check out What Does a Bad Termination Look Like?
trueCABLE presents the information on our website, including the “Cable Academy” blog and live chat support, as a service to our customers and other visitors to our website subject to our website terms and conditions. While the information on this website is about data networking and electrical issues, it is not professional advice and any reliance on such material is at your own risk.