No products in the cart.
Payment methods accepted
Unsure what Ethernet cable you need?
Look no further than our Ethernet Cable Finder. Answer a couple of questions and let trueBOT guide you to the perfect cable for any situation.
Still have questions? Check out our in-depth blogs, insightful white papers, and instructional videos on all things Ethernet cable and low voltage supplies.
Read: The Difference Between Cat6 vs Cat6A Ethernet Cable

Understand: Selecting the Correct Outdoor Ethernet Cable
Time to find coaxial cable and connectors for your install? Well, you are in the right spot!Check out our in-depth blogs, white papers, and instructional videos about everything going on in the low voltage industry and one of the best sources for coaxial information.
Have questions? Our networking experts have the answers!Check out our Cable Academy. for more information.
Read: The Difference Between Dual Shield vs Quad Shield Coaxial Cable
Understand: How To: Universal RG6 Compression F Connector on Quad Shield Coaxial Cable
Fiber Optic expertise at your fingertips.
Looking to deepen your understanding of fiber optic technology? Look no further than trueCABLE's Cable Academy. Our extensive collection of blogs, masterfully crafted by industry experts, offers a wealth of invaluable insights into the world of fiber optic cabling.
Have questions? Our networking experts have the answers.Check out our Cable Academy. for more information.
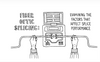
Read: Fiber Optic Splicing: Examining the Factors that Affect Splice Performance
Understand: Using Fiber Optics to Extend Your Ethernet Network Beyond Copper's Limits
Effortless cable management. Learn how we do it.
Low-voltage tools and accessories should keep your networking installations clean and organized. trueCABLE has a variety of high quality cable management tools, accessories and informative blogs for all your installation needs.
Check out our Cable Academy today and expand your knowledge.
Read: Copper Fabric Strips for Bonding Shielded Ethernet Cable
Understand: When Aliens Attack! Avoiding Ethernet Alien Crosstalk

Written by Don Schultz, trueCABLE Senior Technical Advisor, Fluke Networks Copper/Fiber CCTT, BICSI INST1, INSTC, INSTF Certified
A few years ago I came across a residential installation that needed shielded Ethernet cable to be installed. The reasons were some of the cable drops came a bit too close to AC 120V circuits and especially due to several shielded outdoor aerial runs. There are several reasons why shielded Ethernet cable should be chosen over unshielded, which is covered in Top 2 Things to Consider When Running Ethernet and Power Cable. Shielded Ethernet cable poses a bit of an issue for residential installations; just exactly how do you bond your cable shields to ground? Of course you terminate your shielded solid copper Ethernet cable to shielded keystone jacks, and then snap them into a shielded patch panel, but you still have not resolved your problem. You only completed the ground path up to the patch panel, but no further. The shielded patch panel itself needs a proper path to ground, or your work and expense is for naught.
Well, this issue has been resolved. Watch this video but also please keep reading the rest of the blog when you're done!
Normally, in a business environment, bonding to ground is handled via a copper busbar installed on your rack and you simply screw down the bond wire that came with your patch panel to that busbar. The busbar is then bonded to a primary or secondary busbar mounted in the telecommunications room/closet right out in the open, ready to bolt to. The primary and/or secondary bus bar is further bonded to your AC system ground through various methods. You have a complete path to ground! Here are a couple of photos of how that looks:

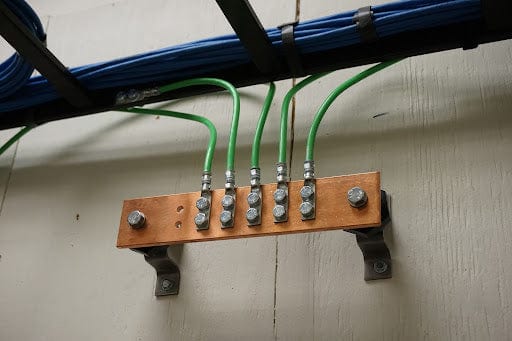
RBB (rack busbar) in top photo. SBB (secondary busbar) in the bottom photo. Combined, these hunks of copper serve as a dedicated extension of the building AC system ground, mounted in an easy to reach spot. This stuff is expensive, by the way, and so are the tools and double lug connectors. If this sort of setup has grabbed your attention and you want to learn more, please see Commercial Bonding and Grounding of Ethernet Cable Systems.
You have no such nice and straightforward bonding infrastructure to work with in your average home or small business office. You have 3 prong AC outlets, and that is about it. Essentially, the only way to access a residential style AC ground system is to get to it through that third AC outlet prong. Well, you could also dig inside your walls, but that would be rather inconvenient and exceedingly bad for your drywall. Anyone living with you would likely think you have flipped your lid, too.

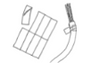
Typical residential setup, using a mixture of shielded and unshielded Ethernet cable (along with some A/V couplers). All wired up, but no place to bond to ground! Or is there?
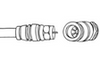
There is a simple solution and it is called Shielded Ethernet Patch Panel Bond & Ground Extension Wire Adapter. Our Technical team calls it “truePLUG” for simplicity. That other name is far too long. Blame the trueCABLE Marketing folks, not me!

Here it is. truePLUG. It is an incredible problem solver!
Just how simple is truePLUG? Well, one picture will say a thousand words:

Yup, it is that easy. Crazy nobody thought of this before, eh?
First and foremost, you must be sure your AC outlet is properly wired. No, there is no risk of electric shock but if your third prong (ground) is not working properly then you will have no bond to ground and truePLUG won’t provide any benefit. There are a shocking (pun not necessarily intended) number of residential AC system installations where the electrician cut corners and did not wire up that third prong. This is why there are three prong outlet testers, and they are simple to use and inexpensive.

Simple AC outlet tester. The mock-up outlet is not live, so the lights did not light up for this photo.
Plug in the AC outlet tester and watch the lights light up. If the sequence of lights does not correlate to “correct” per the printing on the tester then consult a qualified electrician to correct this. Use of truePLUG is not recommended until the wiring is correct.
Now, assuming your wiring is correct, let's install this handy accessory. Feel free to follow along with the video below or keep on reading for more information!
Step #1 - Remove the stock 8” bond wire present on the shielded patch panel
Our shielded 24 port multimedia A/V modular patch panel has a pre-attached bond wire that is screwed down. Back out the screw one full turn.

Back out the screw one turn, but don’t remove it. This requires a medium Phillips screwdriver. Remove the bond wire and set it aside. It might make a good cat toy.
Step #2 - Screw down the “Y” fork terminal in place of the stock bond wire

Again, using a Phillips screwdriver attach truePLUG’s Y terminal
Step #3 - Plug in truePLUG. Done!

truePLUG, all plugged-up!
Notes and tips
Well, that was quick and easy wasn’t it? Quite frankly I still scratch my head trying to figure out why nobody ever thought of this before. Sure there are variations on the theme to allow bonding of ESD wrist strips and ESD mats to ground, but nothing designed specifically for shielded patch panels. Well, now there is.
Before we designed this accessory, I had to jury rig up a contraption that included a separate plastic plug (with plastic hot/neutral prongs), a banana plug screwed to a wire I had to purchase and cut, and then a terminal I had to attach to the other end of the wire. All said and done, that little project worked but cost me over $60 in material and tools. It is also not nearly as solid or professional looking as truePLUG. With that said…
HAPPY NETWORKING (and grounding)!!!
trueCABLE presents the information on our website, including the “Cable Academy” blog and live chat support, as a service to our customers and other visitors to our website subject to our website terms and conditions. While the information on this website is about data networking and electrical issues, it is not professional advice and any reliance on such material is at your own risk.